Not many of you know how connecting Facebook Ads to Data Studio for free works. Without a doubt, Facebook ads are overly popular. Why would they not be popular when Facebook attracts over 1.4 billion users daily? Before advertising on Twitter, Instagram, or any other social website, most people will consider marketing their products and services on Facebook. Besides a massive following, Facebook offers a solid reporting platform. Just as popular are Google Ads, formerly known as Google AdWords. Both Facebook Ads and Google Ads that you post are non-free marketing channels. However, they would be more productive and helpful if there was a way to connect them. Imagine how great the outcome would be if you made your Facebook ads appear with your Google ads and products. We will discuss that in this article. We will mention Google Data Studio (GDS) severally.
Why connect Facebook ads and build an overview dashboard?
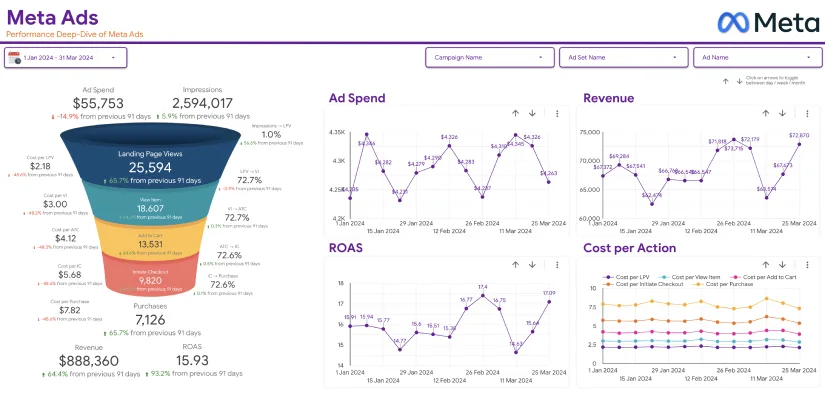
Once you have a Facebook Ads data studio account, you can consistently monitor its status. You can tell which Key Performance Indicators are performing well and which ones are not. Overall, you can get a general idea of how your Facebook ad campaigns are performing. With full-day access to relevant data, you can alter and twist your marketing campaign. Besides, you can study the data to know the best ways to target your audience when designing future campaigns. Additionally, other users of your Data Studio platform can use the same Facebook Ad dashboard without any problems. Before showing you how connecting Facebook ads to Data Studio for free works, lets us introduce Google Data Studio.
Introducing Google Data Studio
Where does GDS come in, and how can you get Facebook ads connected to it? Data Studio has a structure that enables a user to pull in data from various sources. You can pull in data from up to twelve data sources. Secondly, it is a free data reporting and visualization tool enabling you to view how your ads are performing. Companies and individuals use GDS mainly because it is free and comes with video tutorials.

Although you can connect Facebook Ads to GDS for free is an option, some people prefer to pay. Such users pay certain brands to give them free Data Studio Facebook connectors. With the lowest cost per month being thirty dollars, you can imagine how quickly it would rise when your business grows. Just like many small business owners with a limited advertising budget, you can use the free connecting method.
Connecting Facebook ads to Data Studio for free via static data source
We will reveal how you can pull data from Facebook and add it to your Google sheet before connecting it to GDS. When considering one of these free connections, only two options are at your disposal. The first one entails the use of Google Apps Script to design a Facebook connector. The second choice is to use a static data source.
The reason why you must deal with the two options is that Google has no special feature for connecting Facebook Ads to Data Studio for free. Hence, to assist you create your first report from Facebook Ad data; we will introduce the static data source method.
In this method, you will try and pull data into GDS from a Facebook Ads data source by uploading a CSV file. Before we can start, ensure that you have an active Google account, a Facebook Ads account, and basic knowledge of using Google Apps Script and FB API. Needless to say, your internet data connections should be reliable during the exercise. Check the following steps:
Export Facebook Ads Reports as a CSV text file
Facebook offers choices regarding the data you would like to export as CSV. Therefore you can choose certain campaigns, Ad sets, Ads, or columns. Here are easy steps to follow:
- Visit the Ads Manager tool of your Facebook Business account. If you have no account, then you might want to make one here: https://www.facebook.com/adsmanager/
- Click on the Export icon found in the top-right area
- Next, click on Export Table Data
- After that, select Save as .csv and then click Export
- Click on Export All if you require every piece of data and Export Selected if you need certain ad sets or campaign.
- Choose Customize Export when you want to export certain columns.
Make a file upload data set

This is another step in connecting Facebook Ads to Data Studio for free and you need to choose a file upload data set that consists of files that have a similar structure. Next, link to it and make data sources that rely on that data. Hence:
- Sign in GDS
- Click on Create on the top left side
- Choose Data Source and name it in a way you can recall later.
Upload the CSV text files to Data Studio
The process of doing this is easy and it involves the following steps:
- Move to the Connectors panel and choose File Upload. This connect is built-in GDS and can let you link your GDS account to CSV files.
- Authorize your Google Data Studio to upload your information to Google’s Cloud Storage.
- Drag a file or more from your PC or mobile to the upload target. Alternatively, click Upload Files and choose the ones you want to attach.
- See if the files appear in the data set.
Although the CSV method works, it limits you to pulling in only 2GB of Facebook Ads information into GDS. Besides, you cannot upload more than one hundred files per data set in one day. Also, each CSV file size is only 100MB and all uploaded URL files must have a similar structure.
Use a connector like Super metrics
When you choose to add Facebook Ads data to Data Studio for free, you can use the Supermetrics connector. So you will add ads as a data source to the dashboard. Here are the easy steps to follow:
First Step – Connecting to your Facebook ads
- The first step here in connecting Facebook Ads to Data Studio for free entails opening a new document in Data Studio
- Move to the bottom right corner and choose to Create a new data source
- Connect to your Facebook Ads accounts by choosing Facebook Ads by Supermetrics. This is in the connector gallery.
- Permit the connector by clicking on the Authorize button. So, after connecting Facebook accounts, choose the ones you want to use.
- Select the conversion window and reporting time zone if you also want to alter them. Finally, click on Connect.
Step 2: Edit fields and come up with custom metrics

- There will be a long list of metrics and dimensions. Hence, you can choose to rename metrics and make calculated fields. So when done, click Add to report.
- The Resource tab and Manage data sources are both located at the top of the dashboard. Click Resource and then choose Manage data sources to review your data sources.
- Start data visualization because your Facebook Ads accounts now connect to the dashboard.
Third Step: Add graphs and charts to the report
- Next, give the dashboard a name with the help of the text widget. Also, you can change the font type, size, and color when you select the text box. Do so in the right-hand menu.
Fourth Step: Choose a Date filter for your dashboard
- Choose the date tool and decide on the range of dates. These are the dates that will appear by default when you try to open the dashboard. If you want to modify their appearance, you can alter fonts and colors from the menu located on the right side. If possible, choose a shorter date range, like one month period.
Fifth Step: Split the sections with a colored line via the rectangle widget
- Also in connecting Facebook Ads to Data Studio for free, add text to the divider to select the name of the upcoming section.
Sixth Step: Choose metrics that show the status of your account.
- Examples of these metrics can be clicks, a conversion, the amount spent, impressions, and CPC. However, since your ad campaign and business are unique, your metrics might also look different. Again, use the rectangle tool to customize your metrics so they can be catchier and easy to detect.
- Then click Add a Chart by choosing it on a dropdown menu and select Scorecard with compact numbers. Add the scorecard to the first rectangle, move to the right-hand menu, and adjust the metric from the Data tab. If you want to, alter the color, size, and font by moving to the Style section.
Seventh Step: Copy and paste the scorecard

- As well as copy-paste, also choose a different metric per copied scorecard in this step.
Eighth step: Come up with time series graphs
- To show how metrics have changed over time, you can use a couple of time-series graphs.
- So, move to the Add a Chart area and select the time-series graph style you want to create.
- To add an extra metric, access the sidebar located on the right. Then click on Add Metric.
Ninth Step: Copy and paste time series graphs
- In this step of connecting Facebook ads to Data Studio for free, you can also add separate metrics to the copied time-series graphs.
Tenth Step: Add a campaign performance table
- The lower section of your dashboard deserves more content. So, with the rectangle too, select Add a chart and select the Table tab.
- Add as many metrics as you want to showcase. At the same time, open the Style tab to personalize your table.
Eleventh Step: Add a new widget to the bottom right corner
- Finally, add a pie chart, a geo map, or a stacked chart to the bottom right corner of your dashboard. Whatever you pick just to ensure it represents something important like clicks.
An Alternative Free Facebook Ads Data studio Connector
Before you bother using a paid connector, ensure you get familiar with Adveronix. The name is fancy, but it is nothing but a free add-on for your Google Sheets. It pulls data into Google Spreadsheets, allowing the user to link it to their DS dashboard. To avoid another manual process, you can schedule when you want the tool to import data automatically. So, how can you install Adveronix? As with other connectors used when connecting Facebook Ads to Data Studio for free, the first instruction says that we should create a Data Source first.
Step one: Create a Data Source

- Install the Adveronix Google Sheets add-on
- So, open a new Google Spreadsheet and click on the Add-ons icon. Then reply by hitting Get adds-on.
- After that, search for Adveronix.
- Then, install the add-on and finish the process.
Step Two: Make a custom report
- Open the Adds-on menu at the top once again and click on Adveronix add-on.
- Hit Launch to see a control panel in the right section of the screen. From here, choose all the channels you wish to import data from. So, choose Facebook Ads.
- Select the ads account and as well as the fields you want to import. If needed, choose a free template from Adveronix to simplify the task.
- Next, choose the Options icon at the bottle of your control panel. Then you will see various options to help you save the report. From these, choose Save Report and give it a name. After that, click on Get Data.
Step Three: Schedule the Reports
- Here you want to schedule your reports to ensure so that they can run automatically.
Step Four: Connect the report to the dashboard
- Open the dashboard and hit the File button in the top menu section. From there, choose Report Settings. A panel will appear to the right side, and so you have to click on Data Source.
- Choose the spreadsheet you have made using the Adveronix connector.
- Then, click on the Refresh data button, which is at the top View product menu. You will see if all areas of your report are working.
Unlike a tool like Supermetrics, connecting Facebook Ads to Data Studio for free with Adveronix is free of charge but has disadvantages. Besides not offering real-time updates, it does require frequent maintenance. As it works with Google Sheets, you can encounter issues just because of careless data entry mistakes. It cannot fix these mistakes; its work is to import data. So, you have to solve the issues.
Conclusion
Google Data studio connects to any other Google product, explaining why you need third-party add-ons and connectors. Now you know how to connect Facebook ads to GDS for free, thanks to this guide. Would you like to try the process? We would encourage you to try our methods to boost business with your clients. And if you want to pull in LinkedIn ads, Twitter ads, or ads from another social media account, you can repeat the same steps. Then, you can read and view this data in its simplest form. This can then lead to better decisions.